I played a lot with the different templates of AWS CodeStar, but finally there was no template that matched for a simple Angular SPA.
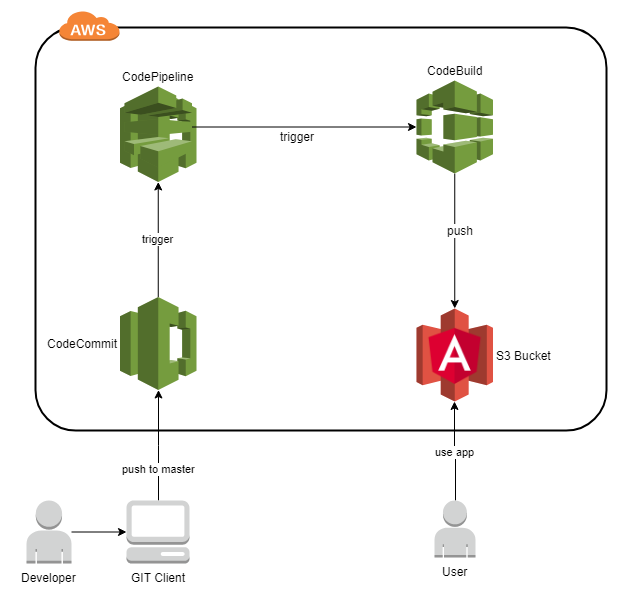
I simply wanted to push the code of my angular project to the AWS Cloud were the master branch is automatically built, tested and deployed to a S3 bucket that finally provides the Angular application.
Preconditions
- You have an AWS account
- You prepared your local environment to commit to AWS CodeCommit (See AWS docu to setup CodeCommit)
Push the angular project to CodeCommmit
Setup the repository

Setup the angular project if you have not yet
ng new angularcloudproject
Push the project to the AWS CodeCommit git repository
git init
git add .
git commit -m "init angular project"
git remote add origin https://git-codecommit...... (you find your repository url in your CodeCommit project)
git remote -v (verify the repo url)
git push origin master (enter the AWS IAM user´s security credentials)
Setting up the S3 bucket
Create a S3 bucket

Enable static webhosting

Now you can call the endpoint seen in the dialog above, but you will get an error 403 because the index.html does not exist.
Setting up the integration and deployment
Configure headless browser testing
To execute the karma tests in headless mode you have to change the browser to ‚ChromeHeadless‘ and therefore apply some custom configuration
customLaunchers: {
  HeadlessChrome: {
    base: 'ChromeHeadless',
    flags: ['--no-sandbox','--headless','--disable-gpu','--remote-debugging-port=9222']
  },
}
To execute the protractor e2e tests in headless mode you have to apply the capabilities sections
capabilities: {
  browserName: 'chrome',
  chromeOptions: {
    args: ['--headless', '--disable-gpu', '--window-size=800x600','--disable-dev-shm-usage']
  }
},
Create the build specification
Now we specify how our project is built via the AWS CodeBuild.
So first add „prodbuild“ to the scripts section of your package.json that calls „ng build –prod“.
Then add a file called „buildspec.yml“ to the root path of your project that contains:
version: 0.2

phases:
  install:
    commands:
    # Get Chrome Information
      - curl -sS -o - https://dl-ssl.google.com/linux/linux_signing_key.pub | apt-key add -
      - echo "deb http://dl.google.com/linux/chrome/deb/ stable main" >> /etc/apt/sources.list.d/google-chrome.list
      - apt-get -y update
      - apt-get -y install google-chrome-stable
      # Install dependencies needed for running tests
      - npm install

      # Upgrade AWS CLI to the latest version
      - pip install --upgrade awscli
  build:
    commands:
      - echo Build started on `date`
      - npm run prodbuild
  post_build:
    commands:
      - echo Test started `date`
      - npm test
      - npm run e2e
      - aws s3 cp --recursive dist/angularcloudproject/ s3://$S3_BUCKET/ --grants read=uri=http://acs.amazonaws.com/groups/global/AllUsers
The build is specified as following:
- Install
- the npm dependencies are installed
- the AWS CLI will be upgraded to the latest version.
- Google chrome is installed for the tests
- Build
- the production build is triggered
- Post build
- the unit tests are executed
- the e2e tests are executed
- finally the built artifacts are pushed to the S3 Bucket where the environment variable S3_BUCKET will be injected by the build tool.
Commit and push your changes to the git repository.
Create the CodeBuild project
Now we create a new AWS CodeBuild with the paramters:
- Source: your CodeCommit project Git with the clone depth: full
- Artifacts: no artifacts
- Environment: Ubunto / NodeJs 8++
- Service role: create a service role in your account (remember the role name)
- Advanced Options –> Environment variables: S3_BUCKET : <YOUR_S3_BUCKET_NAME>
Modify the IAM Service Role
Because we want to copy the built artifacts directly to our S3 bucket, the executing CoceBuild role need access rights to do so.
- Open the IAM administration in your AWS console and open the roles section.
- Click on your service role that should look like „codebuild-<YOUR_PROJECT_NAME>-service-role“.
- There click on the policy and „Edit policy“
- Your screen should look like following
- When you mouse over the „Actions“ and „Resources“ you can edit them.
- Change actions to „All S3 actions“.
- Switch „Resources“ to „Specific“.
- Add the ARN of your S3 bucket (e.g. „arn:aws:s3:::<S3_BUCKET_NAME>“)
- check „object“ any option
- remove the resource restriction
- Review and save your changes.


Trigger the build
Because we have not set up a build pipeline yet we still have to trigger the build manually in AWS CodeBuild.
We do so now to check if the CodeBuild works.
After the build has finished the artifacts have been pushed in your S3 bucket and your application is reachable through the S3 static web hosting endpoint.
Setting up the build pipeline
Because we want to build and update the artifacts in the S3 Bucket automatically after each commit on the repository´s master branch we will setup a pipeline.
For this create a new AWS CodePipeline and use the master branch of your CodeCommit repository as its source.
Build provider is your already existing AWS CodeBuild project.
Because we deploy the artifacts within the build script by copying it directly to the S3 Bucket we need „No deployment“.
Create a new service role for this pipeline with the predefined values.
Now you can test the pipeline by „release changes“.

Your repository now will be automatically read, built and the artifacts pushed to the S3-Bucket each time you commit to the master brunch.
If you are interested in using redux in angular, read my article about the ReplicationBuilder.
If you are interested in JavaFX, read my article about JavaFX Architecture.